Quick overview (what you’ll learn)
You’ll get a complete, practical roadmap to produce a strong research paper: choosing a topic, searching literature, designing methods, writing each section (title → abstract → intro → methods → results → discussion → conclusion), referencing, formatting, choosing a journal, submitting, and handling peer review. Packed with short tricks, templates, checklists, and deep dives.
1. Start with the right mindset
- Research = storytelling + evidence. You're telling a true, supported story about a question you investigated.
- Aim for clarity, reproducibility, and contribution. Every sentence should move the reader toward understanding what you did, why it matters, and what you found.
- Be ruthless about scope. A good paper answers one main question very well. Save side-quests for later papers.
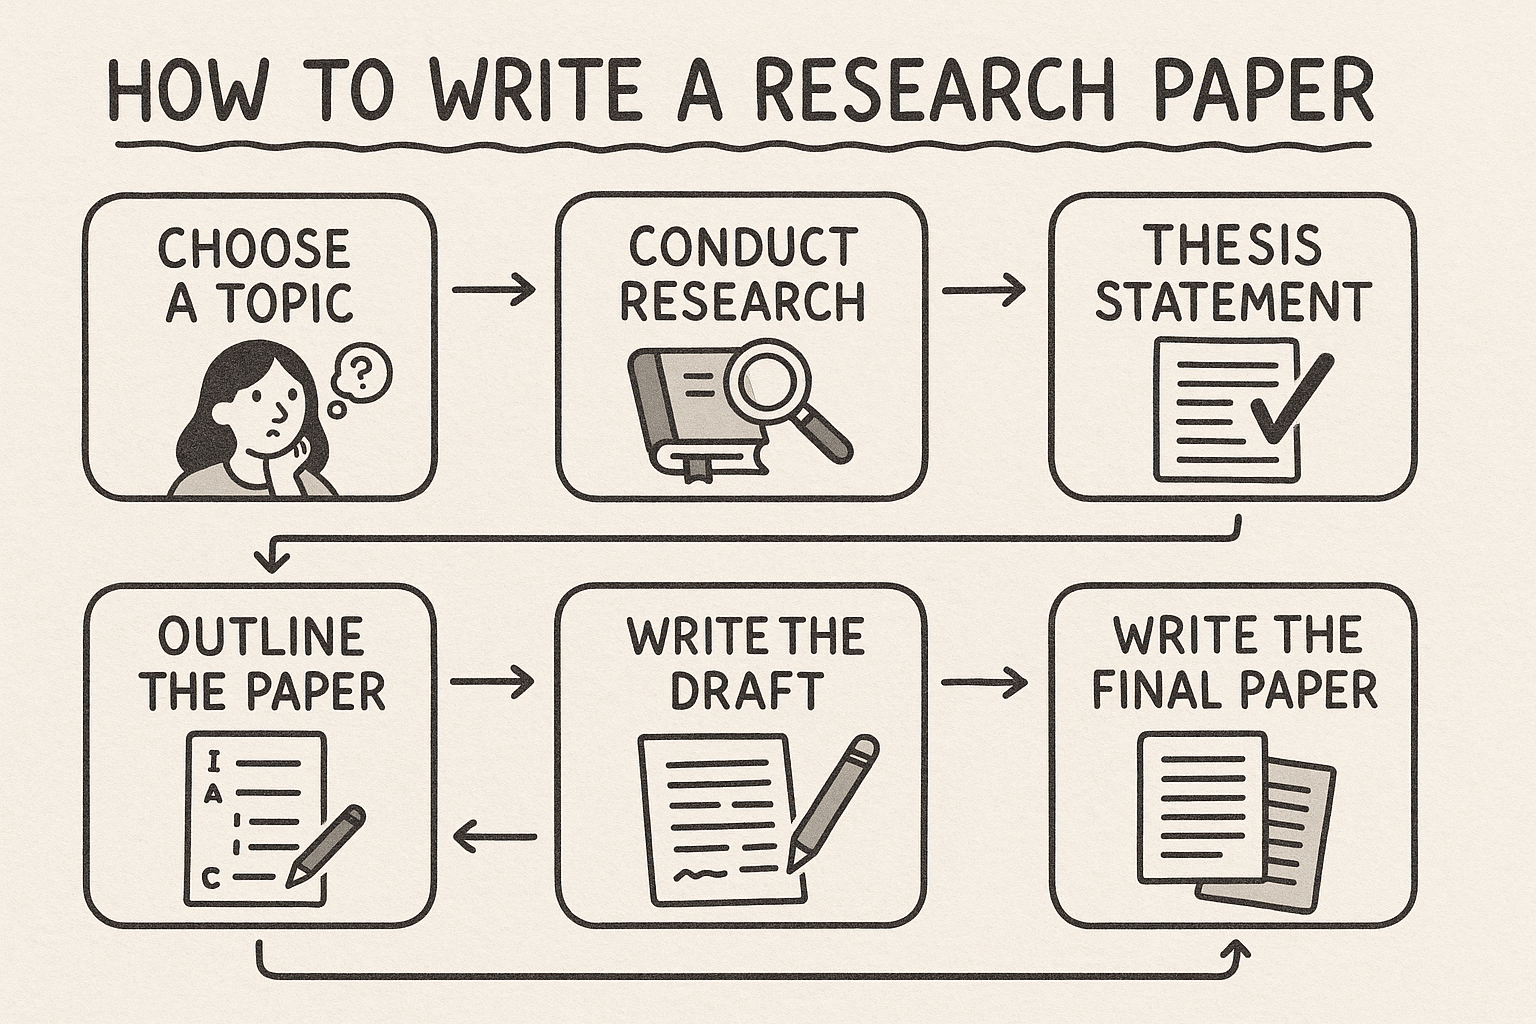
2. Choose a focused, meaningful topic
Steps:
- Identify an area of interest (class, seminar, dataset, job problem, supervisor idea).
- Narrow it: go from “machine learning” → “automated grading for short answers” → “improving rubric-based automated grading for 1–3 sentence responses in introductory CS”.
- Ask the research question: Aim for a single clear question (or 1 main + 1–2 secondary). Example: Does model X with feature set Y outperform baseline Z in scoring short student answers?
- Check feasibility: data access, methods you can apply, ethics/IRB needs, time and tools.
Short trick: write the research question as a single sentence. If it’s longer than 25–30 words, tighten it.
3. Quick literature reconnaissance (before deep dive)
- Goal: confirm the question is novel and find methods & measures used by others.
- Tools: Google Scholar, PubMed, IEEE Xplore, Scopus (if available), university library, ResearchGate.
- Search queries examples (boolean):
"automated grading" AND "short answers""rubric" AND "inter-rater reliability" AND "student responses"- Short trick: sort by most recent and most cited — read the abstract + conclusion first. Use the “cited by” and “related articles” links to expand quickly.
4. Deep literature review — how to do it well
- Make a structured map: Create folders / a spreadsheet with columns: citation, research question, sample/population, methods, measures, key result, limitation, how it relates to your question.
- Do forward and backward citation chaining: read references of a seminal paper (backward) + see who cited it (forward).
- Identify gaps: inconsistent results, under-studied populations, outdated methods, poor measurement. These are your openings.
- Short trick: write one paragraph per paper summarizing contribution + one sentence on relevance to your paper.
5. Define your contribution & write a research statement
At the end of your lit review, write a 2–4 sentence research statement that says:
- What you study
- Why it matters (gap)
- What you do (approach / method)
- The big result/claim (if known)
Example: This paper examines whether adding rubric-based features improves automated short-answer grading accuracy. We test Model X on Dataset Y and show a 12% improvement in agreement with human raters, especially for partial credit cases.
Short trick: keep this handy — it becomes your introduction backbone and the basis for your abstract and title.
6. Design the study (methods planning)
- Decide study type: empirical (experiment, observational), theoretical, review/meta-analysis, or case study.
- Specify variables: independent, dependent, control variables, confounders.
- Sample & data: define population, sampling method, sample size calculation (if applicable). For experiments, draft the protocol.
- Measurement: Choose validated instruments or explain custom measures; define how you’ll operationalize constructs.
- Analysis plan: which statistical tests, models, or qualitative analysis method will you use? Pre-plan analyses and robustness checks.
- Reproducibility: plan to share data/code (anonymize when needed), decide file formats, version control (Git).
- Ethics: IRB/ethics approval if human subjects, consent forms, data privacy (GDPR-like concerns), data storage.
Deep dive: For quantitative work, write a short analysis plan file: expected distributions, tests (t-test, ANOVA, regression), transformation plans, multiple comparison corrections, effect sizes you aim to detect, and software (R/Python/SPSS).
7. Collect data & keep a lab notebook
- Organize from day one: use standardized file names, a README describing each file, and a raw → processed workflow.
- Log decisions: any cleaning steps, exclusions, imputation must be recorded.
- Short trick: export a snapshot of raw data immediately and save a copy untouched.
8. Analyze with transparency
- Run planned analyses first. Then perform exploratory analyses but label them clearly as exploratory in the manuscript.
- Report assumptions and diagnostics (heteroscedasticity, normality, multicollinearity).
- Show core numbers — effect sizes, confidence intervals, exact p-values (not just “p < 0.05”).
- Visualization: clear, labeled charts. Avoid 3D and unnecessary embellishments. Always include sample size (n) in captions.
Typical structure (common across sciences; adapt for humanities/social sciences):
- Title (concise, informative)
- Authors & affiliations
- Abstract (150–250 words)
- Keywords (4–6)
- Introduction (Background + gap + research question + contribution + outline)
- Literature Review (sometimes merged into Introduction)
- Methods (clear enough for replication)
- Results (facts, tables/figures)
- Discussion (interpretation, limitations, implications)
- Conclusion (brief, contribution + future work)
- Acknowledgments
- References
- Appendices / Supplementary materials (detailed methods, additional tables, questionnaires, code links)
Short trick: write a two-line summary for each section before you draft — it keeps you focused.
10. Writing each section — templates & tips
Title (do this after you write the paper)
- Formula: [Main result or method] + [population/context] + [optional: tool/approach]
- Keep it searchable: include main keyword, avoid jargon & abbreviations.
- Examples:
- Weak: “New method for grading”
- Strong: “Rubric-enhanced Transformer Model Improves Automated Grading of Short Student Answers”
Abstract (150–250 words)
Template (4–5 sentences):
- 1–2 sentences background and gap.
- 1 sentence objective / research question.
- 1 sentence methods (sample, approach).
- 1–2 sentences key results with numbers (e.g., “12% higher agreement (κ = 0.72)”).
- 1 sentence conclusion / implication.
Short trick: include one numeric result; makes the abstract concrete.
Introduction
- Start broad → narrow to the gap → research question → brief summary of approach and findings → paragraph on contributions → roadmap of the paper.
- First 100 words must clearly say what the paper is about (SEO: include main keyword early).
Methods
- Use subheadings (Design, Participants/Data, Instruments/Tools, Procedure, Analysis).
- Enough detail to replicate. Include software versions, packages, and parameters. Example: “We used Python 3.10 and scikit-learn 1.2; hyperparameters: learning rate = 0.001, epochs = 50.”
Short trick: past tense, neutral voice.
Results
- Present core results first. Use tables + figures for clarity. Each table/figure should be self-contained (caption + notes).
- Don’t interpret here — save interpretation for Discussion.
Discussion
- Interpret results relative to research question and literature.
- Explain why you got the results (mechanisms).
- Discuss limitations honestly.
- Suggest practical/theoretical implications and future research directions.
Conclusion
- 3–5 sentences: restate main contribution, one key implication, and one future direction.
11. References and citation management
- Choose a citation manager: Zotero, Mendeley, EndNote, or BibTeX/Overleaf for LaTeX.
- Short trick: maintain one library from start; tag items with keywords (e.g., “methods”, “instrument”, “datasets”).
- Citation style: follow the target journal’s style (APA, MLA, Chicago, IEEE). Don’t mix styles.
Deep dive (LaTeX users): Use biblatex + Biber or BibTeX with .bib file. Commit both .tex and .bib to version control.
- Quality: 300 dpi for raster (PNG/JPG), use vector (PDF/SVG) for line drawings and plots.
- Labels: axis label, unit, legend, font size readable when scaled to column width.
- Captions: short title sentence + 1–2 lines explaining the table/figure and sample size, test used, and significance notation. Example caption: Figure 2. Model performance (accuracy) across datasets (n = 300). Error bars = 95% CI.
- Accessibility: add alt text if publishing online.
- Short trick: make figures + tables last; they’re often what reviewers look at first.
13. Editing, style, and clarity
- Write simply: short sentences, active voice mostly, one idea per paragraph.
- Use signposting: “First…”, “In contrast…”, “Therefore…” Guide the reader.
- Avoid filler: be concise — reviewers don’t reward verbosity.
- Proofreading tips: read aloud, use Grammarly or language tools, and get a peer to read.
- Short trick: change font to something unusual or invert colors when proofreading — you’ll spot mistakes.
14. Plagiarism & ethical writing
- Always cite ideas, data, tools developed by others.
- Avoid self-plagiarism: reuse of large chunks from your earlier papers without citation is problematic.
- Authorship criteria: follow accepted standards (contribution to conception/design, drafting/revising, final approval, accountability). Discuss authorship early.
- Conflict of interest: declare funding sources and COIs.
- Short trick: run a similarity check (institutional Turnitin or iThenticate) before submission.
15. Choosing the right journal / conference
- Match scope & audience. Read the journal’s Aims & Scope, recent issues.
- Check requirements: word limits, formatting, figure limits, open access fees (APCs).
- Rank factors: audience relevance > impact factor. Fast journals are not always better.
- Avoid predatory journals: check indexing (Scopus, WoS), editorial board credibility, and Think.Check.Submit guidelines.
- Short trick: prepare a short list of 3 target journals (Top, Realistic, Backup).
16. Prepare submission materials
Common required items:
- Manuscript PDF (or Word) formatted per guidelines
- Title page (authors, ORCID IDs, corresponding author contact)
- Abstract and keywords
- Cover letter (see template below)
- Highlights (if required)
- Supplementary files (data, code, appendices)
- Suggested reviewers (if asked) — give objective names & contact info, avoid conflicts.
Cover letter template (short):
Dear [Editor Name],
Please find attached our manuscript titled “[Title]” for consideration in Journal. This study addresses [gap] and shows [main finding/implication]. We believe it is suitable for your readers because [fit]. None of the authors have conflicts of interest to declare. Thank you for considering our work.
Sincerely,
[Corresponding author, affiliation, email]
17. After submission — peer review & responding to reviewers
- Be ready to wait. (No promises on time.) When reviews arrive:
- Read all reviews calmly. Make a table: reviewer comment — your response — action (changed text, added analysis, rebuttal).
- Prepare a point-by-point response (polite, concise). Quote the reviewer’s comment then your reply.
- Track changes in the manuscript and submit both a marked-up version and a clean version.
- If you disagree, explain clearly with evidence; don’t be defensive.
- If rejected, read reviews, revise, and submit to another journal (address reviewer suggestions first).
Response to reviewers template:
Reviewer comment 1: [quote]
Response: Thank you. We have [action]. See page X, paragraph Y.
(If disagree) Response: We appreciate the point. However, [evidence or justification]. We have added clarification on page X.
Short trick: number the reviewers’ comments and match them to your responses.
18. Post-acceptance steps & publication
- Proofs: check author names, affiliations, figures, tables, equations, and references carefully.
- Data & code availability: upload to repository (Zenodo, OSF, GitHub) and provide DOI/links.
- Promote: prepare a short plain-language summary, social media post, and a figure for Twitter/LinkedIn.
19. Practical time & project management tips
- Chunk the work: small daily goals (300–800 words) + weekly targets.
- Use a writing schedule: e.g., two focused Pomodoro sessions for writing daily.
- Version control: use Git/Overleaf or simple dated files
paper_v1.docx, paper_v2.docx. - Peer accountability: share weekly progress with a buddy or supervisor.
- Short trick: write Methods and Results first — they’re the most objective and easiest to finalize.
20. Common pitfalls & how to avoid them
- Pitfall: Too large scope → Fix: narrow the question; say “preliminary” for broad explorations.
- Pitfall: Poorly defined measures → Fix: use validated instruments or pilot them.
- Pitfall: Overstating claims → Fix: align claims with limitations and effect sizes.
- Pitfall: Bad figures/tables → Fix: one message per figure; make captions informative.
- Pitfall: Messy references → Fix: use citation manager from day one.
- Reference managers: Zotero, Mendeley, EndNote, BibTeX/Overleaf
- Writing & grammar: Grammarly, Hemingway Editor
- Data/code hosting: GitHub, Zenodo, OSF
- Preprints: arXiv, bioRxiv, medRxiv (field-dependent)
- Plagiarism check: iThenticate (institutional), Turnitin
- Search: Google Scholar alerts, PubMed alerts, ResearchGate
22. Appendices: Templates & Examples
Abstract template (fill in)
Background: [1–2 lines about context and gap].
Objective: [One line, research question].
Methods: [Design, sample, key method].
Results: [Main numeric result + CI or metric].
Conclusion: [Interpretation + implication].
Example intro opening lines
- Broad: “Despite decades of research on X, Y remains poorly understood…”
- Narrow to gap: “However, prior studies have not examined Z in population P…”
- Thesis: “This study investigates whether…”
Email to potential coauthor or supervisor (ask for feedback)
Subject: Draft manuscript on [title] – request for feedback
Dear [Name],
I’ve attached a draft manuscript titled “[title]”. Would you be willing to read Sections [which] and give feedback on [specifics: methods, framing, statistics] by [date]? I appreciate your time.
Best, [Your name]
23. Final pre-submission checklist (tick before you hit submit)
- Clear research question and contribution stated in Intro.
- Abstract summarizes the whole paper with a numeric result.
- Methods described enough to replicate.
- Results reported with effect sizes/confidence intervals.
- Figures/tables clear and referenced in text.
- Limitations and implications discussed.
- References complete and style consistent.
- Author list and order finalized; ORCIDs ready.
- Ethics/consent statements included (if needed).
- All supplementary materials and data/code links ready.
- Similarity check done; no plagiarism.
- Journal guidelines followed (formatting, word limits).
- Cover letter prepared and tailored.
Closing (practical next steps)
- Pick one small milestone now: e.g., “Write a 200-word problem statement + research question.”
- Build your references spreadsheet & fill in 10 core papers.
- Draft the Methods & Results first — they anchor the paper.
If you want, I can now:
